|
TCE Glossery of Random References
A dumping ground for helpful and basic info to aide buyers and builders with some simple cross reference information. Use at your own risk.
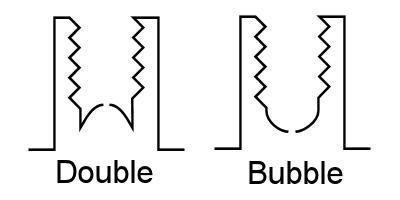
FLARES: What is a Single Flare, an Inverted Flare and a Bubble Flare?
- Single flares are simply hardline being opened up to fit over a male flare fitting. Effective in many applications where dedicated JIC or "AN" fittings are used. This is a single flare with a back up compression sleeve and b-nut that threads onto the 37 degree end of an AN3 fitting such as a bulkhead tee. For more info on these style end please visit Summit or Speedway where you can view the many AN3 options. For most reading this the next two are your more common types.
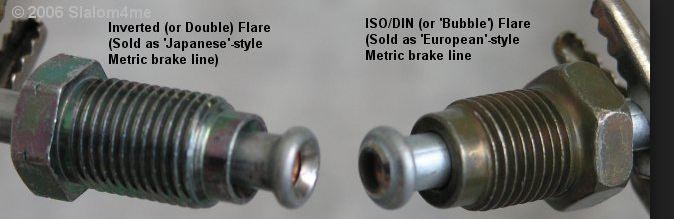
- Inverted flares (sometimes called "double flares") are more production car style fittings and common on older US vehicles (3/8-24 IF it's called) and M10-1.0 on many imports. The tubing is flared one time and then rolled into itself creating a convex look. This seat mirrors that of the chassis fitting.
- Bubble Flares (BF) are common on many European vehicles; BMW, VW, AUDI and more. Here the tubing is swelled on the end creating a mushroom looking end that then compresses into the conical seat of the chassis fitting. Beware: by nature these have been proven to "swell" the ends of the threaded sleeve a bit (GM..) and may require a light dressing with a file to get them started into the female ends of many ss flex lines. Not hard..patience..it'll go.
- How can you identify them? IF fittings are a cone shape, BF have more of a mushroom head. Which one is right for you? Unless you plan on re-plumb your car stick with the factory fittings. Much easier. If you are plumbing a race car with a roll of steel hardline basic single flares are quick and effective- if you use the right adapters. Restoration of American Iron will require the use of 3/8IF fittings usually - 3/8 being 3/8", 24 thread ends, not the size of the steel hardline; that's 3/16", which are still found on some new cars today. M10 fittings are more common on Asian imports and are similar to the 3/8IF fitting but have M10-1.0 threaded ends- again the M10 being the diameter of the thread, the 1.0 the "pitch" or distance from crown to crown of the thread. Nothing to do with the size of the steel line.
- Keeping it right! It's imperative that you use the correct fitting with your car and hose. 3/8-24 and M10-1/0 are VERY similar but will not correctly seal. To that end; crushing your bubble flare into the seat of an inverted flare might seal up...or not...but you have permanently damaged the hardline if you do so.
- In addition to these images and references there are more sizes and threads such as: 7/16-24, M10-1.25, M12 and more... this is the basic info here. Google more if you want to learn more.
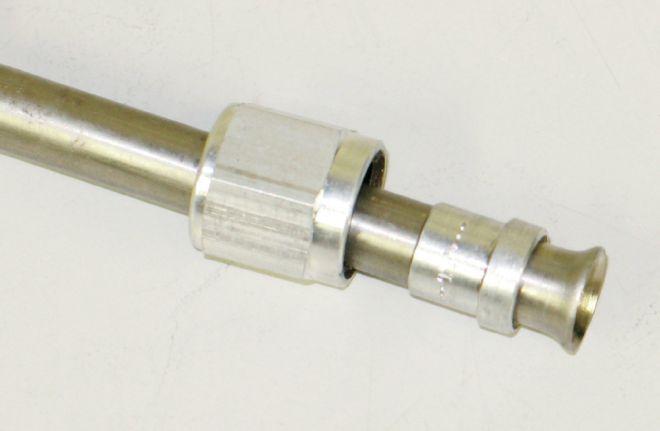
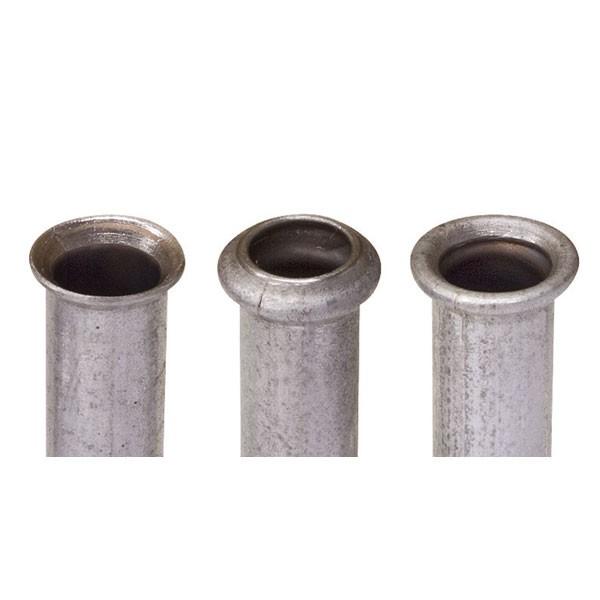
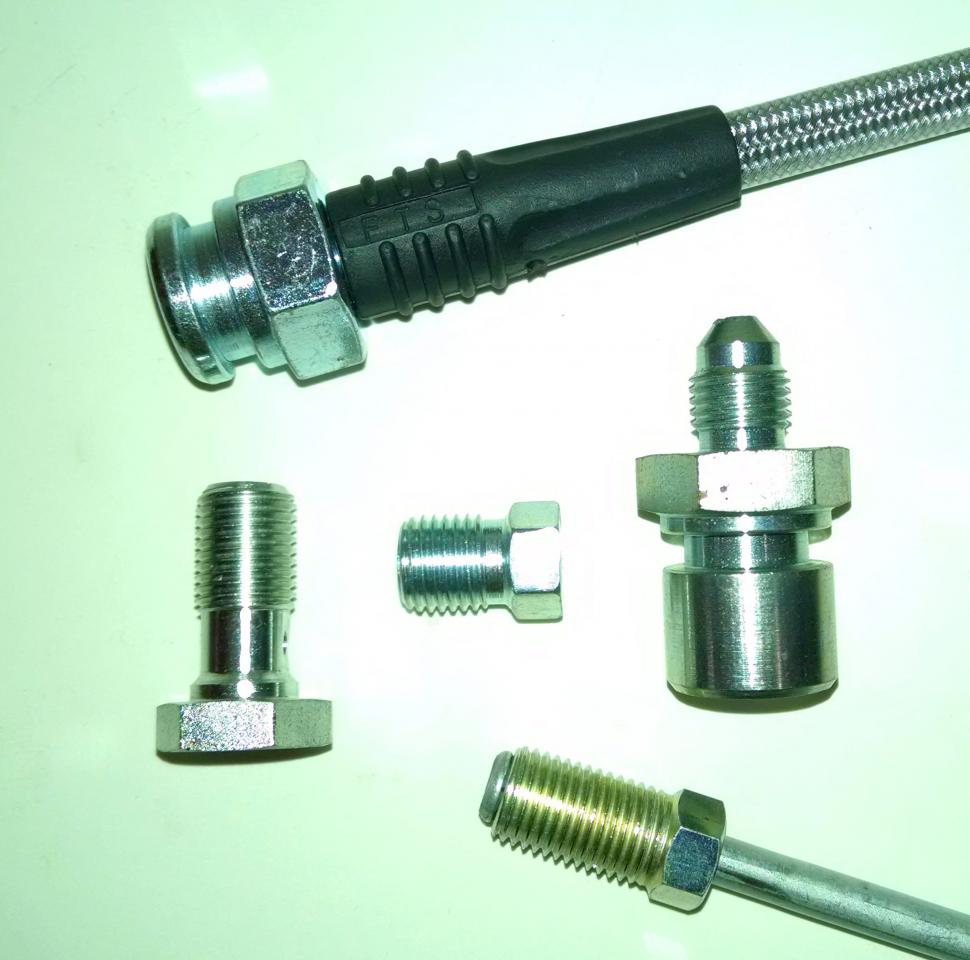
Here in order:
- Single flare; for use with AN style chassis adapters
- Next:; Single, Bubble, Inverted.
- Then; comparing IF vs Bubble.
- Lastly; notice the seats these ends thread into are very different.
THREADS: Metric vs Imperial Thread adapters and hose ends..what the hell?
Ok so you know there are some differences and crossing things up will go way wrong. You sunk $150 into the fancy ss flex hose kit but you're not sure what you really got. Or maybe you're installing said fancy flex hose kit and something doesn't "feel right" about how it's threading. STOP! Take time to verify what you have before you continue. Luckily the hose industry is here to help. Did you know hose ends and chassis adapters are referenced for metric ends??
- Imperial or SAE threads: commonly 3/8-24, maybe 71/6-24 or possibly larger on say... your master cylinder. Most of the time these adapters are clean six sided hexes and that's good.
- Metric ends; be it IF or Bubble flare are often indicated by an additional machine marking on the six sided hex making ID very simple. Common to find metric steel hard lines are also colored.
On the Left: we have Imperial 3/8-34 chassis fittings, flare nuts and banjo bolts.
On the Right; we have the same items but in metric thread. See those little marks? (*not all brands have this)
SPINDLES: Often in conversation a comment is made that the customer does not have spindles that will allow for a big brake kit. Why? Because the stock calipers do not unbolt from the spindle. This can be quite onfusing! Of course you can remove the caliper yes, but it's how the caliper is attached to the spindle that is the issue.
Mounting is how the load path is applied to your vehicle. Meaning when you apply the brakes, the rotational brake force is then transferred to something. It's usually in one of two ways: the caliper is registered and seated in the casting (but has guide pins or clips to slide on) or the entire caliper and slide mechanism is unbolted from the spindle itself. Once removed from the old style spindle the small holes found in many castings are not suited to brake mounting! Most pins are M18 or perhaps M10 thread which for all but the lightest of vehicles is too small. And there's often little meat around those holes to support the leveraged your big brake kit will generate. TCE feels the minimum size bolts used should be M12 for most current vehicles. Don't let those small holes fool you. The more common means today is the 'carrier' or 'hanger' style that has the entire brake assembly being removed from your spindle with the use of two large bolts. These bolts can be found to run both direction; through the spindle and into the threads of the caliper bracket, or through the the bracket and into threaded bosses of the spindle. Again; bolt size is often based on the weight of the vehicle most being M12, M14 and even M16 on larger platforms.
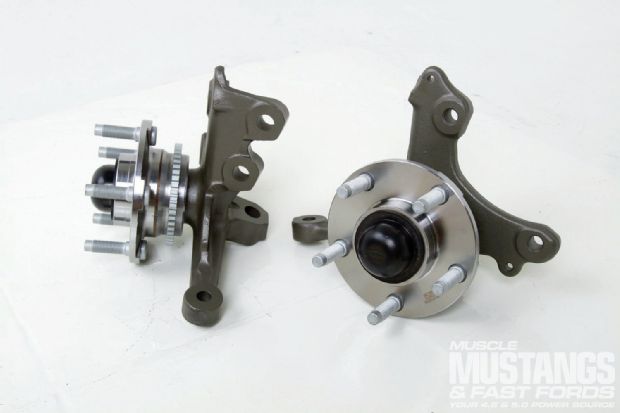
Here are two examples: LEFT is the older style, RIGHT is what's on nearly all cars the past 15yrs or so.
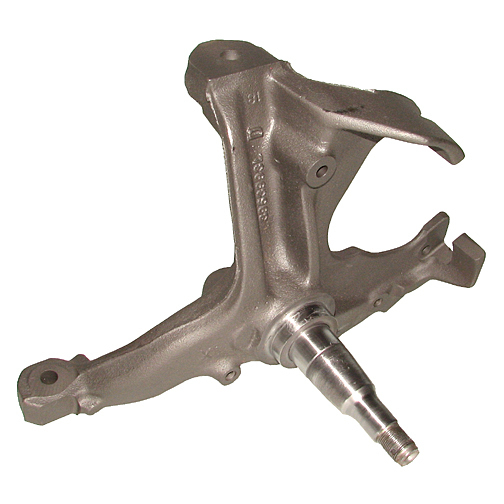 
While we can use either one of them the older style on the Left rquires extensive machine work to create mounting points for the caliper bracket. We often use holes for the dust plate to oversize and fit brackets as they are common enough from side to side for such use and far easier (ie. less $$) to do rather than machine]ing entire 'flats' with holes creating parallel surfaces and such.
The spindle on the Right however is much easier to work from and uses the factory caliper mount holes to fit custom brackets. These holes are already parallel and sized properly for the mounting of your new big brake kit making production lower cost, easier and quicker.
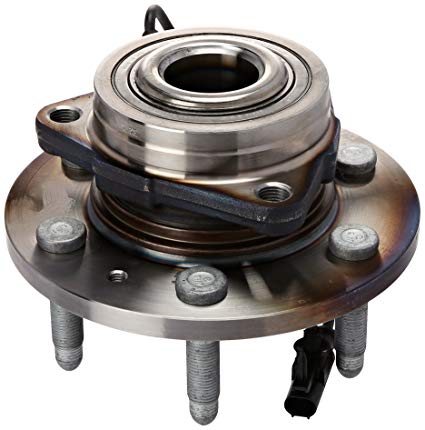
HUBS: For the wheels to go 'round and round' we need hubs. And bearings.
As an extension of the above information on spindles the next thing to consider is the wheel bearing and hub assembly. For the most part, like the caliper mount, it's one of of two things: Older cars use one piece rotors with an integral hub and bearing. Even some older drum cars use this method. Think VW Bug for one. The other is a bearing assembly; be it bolt-on or the press-in canister type used a lot in the early 90s. (I suspect this went away due to the high cost of machining the iron knukles or spindles and the labor of pressing things in and out) Most cars today use the bolt on format making thing simple to assemble and servive.
When the customer has an older vehicle with a one piece rotor we have a couple ways to deal with it: first is the custom hub from Wiwood or another supplier. These are often very nice parts, some of them aluminum. The more common method we've done for the past 20yr is to use the iron hub from your stock rotor. This entails the removal of the stock rotor and possibly some machine work to the finished size needed to fit the remaining brake parts. The best part of this design is that it retains all the stock bearings and seals and is a proven fit. If there's a negative side it's that doing this will shift the wheel out by about 1/4" per side due to the slip over aluminum rotor hat. And for that reason we always fit longer wheel studs too. *If you want to use an aluminum or other suppliers hub that's fine but we'll leave the research to you; you'll need to verify the hubs you plan to use is correct for your spindle; bearing centers, load ratings, wheel offset....
On the Left is the bolt on oe style hub and on the Right is a TCE custom hub.
|